
Home / Buying guide
Your first CNshopper order: from product link to parcel
Follow the twelve stages in CNshopper’s published How to Order guide. The official screens are reproduced in that order; our notes explain what to check before moving on.
Have the product URL, your chosen size and colour, and a destination address ready. Allow for both product payment and international shipping. Screens reflect the official guide captured on 17 October 2026; available payment methods, offers and account labels can change.
Open any image at full size. Some image labels differ from the page headings: for example, the QC image is marked Step 7, while the published guide places QC at Step 8. We retain the official page order and the unaltered images.
- Search for a product or paste its link
- Choose the product
- Choose size, colour and quantity
- Add order notes
- Submit the order and confirm the product cost
- Pay for the product first
- Wait for warehouse arrival
- Review QC photos before international shipping
- Consolidate your items
- Choose an international shipping method
- Pay international shipping
- Track the parcel
Step 1 / 12
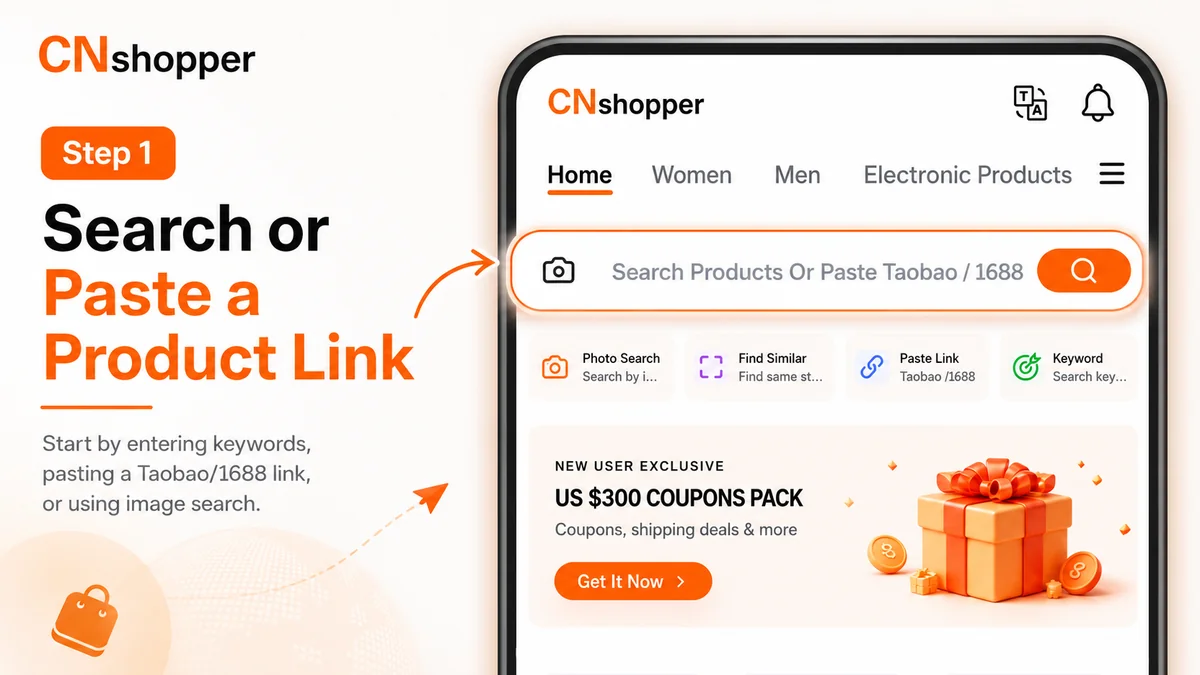
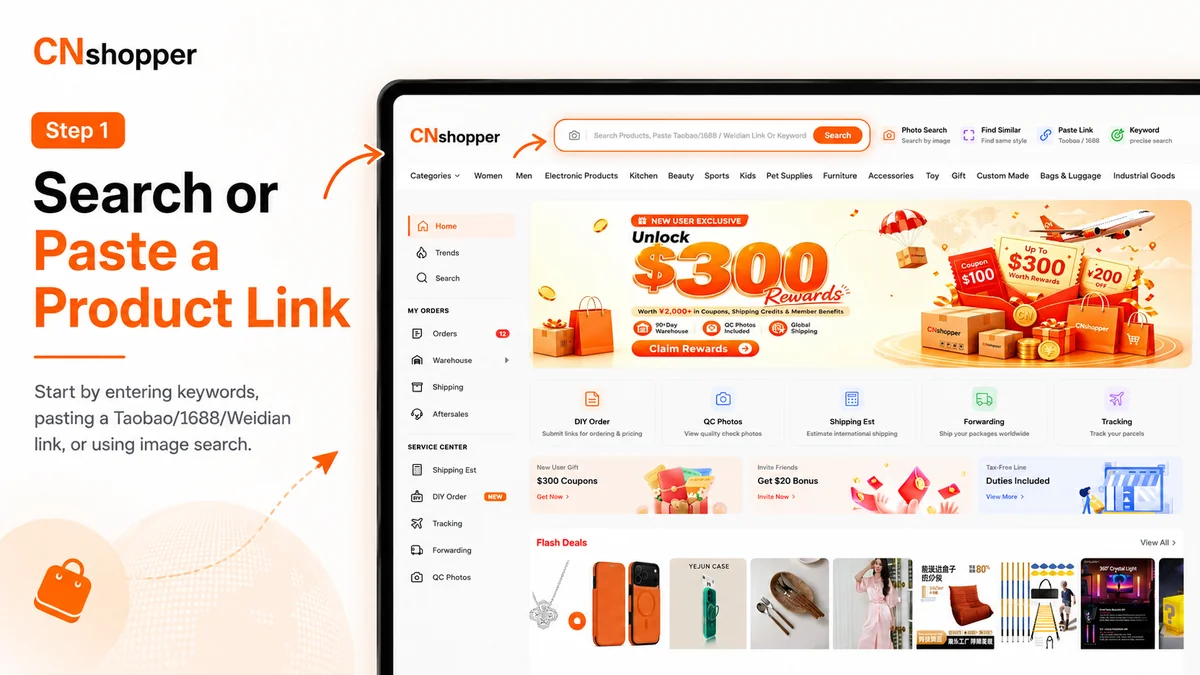
Search for a product or paste its link
Keep the route back to the seller from the beginning. Copy the complete product URL into CNshopper’s search field, then compare the result with the original listing. A forwarded share message may contain a shop link instead of the item. If the result is wrong or cannot load, ask about a supported manual order before paying. Save the working product link with your order notes.
Step 2 / 12
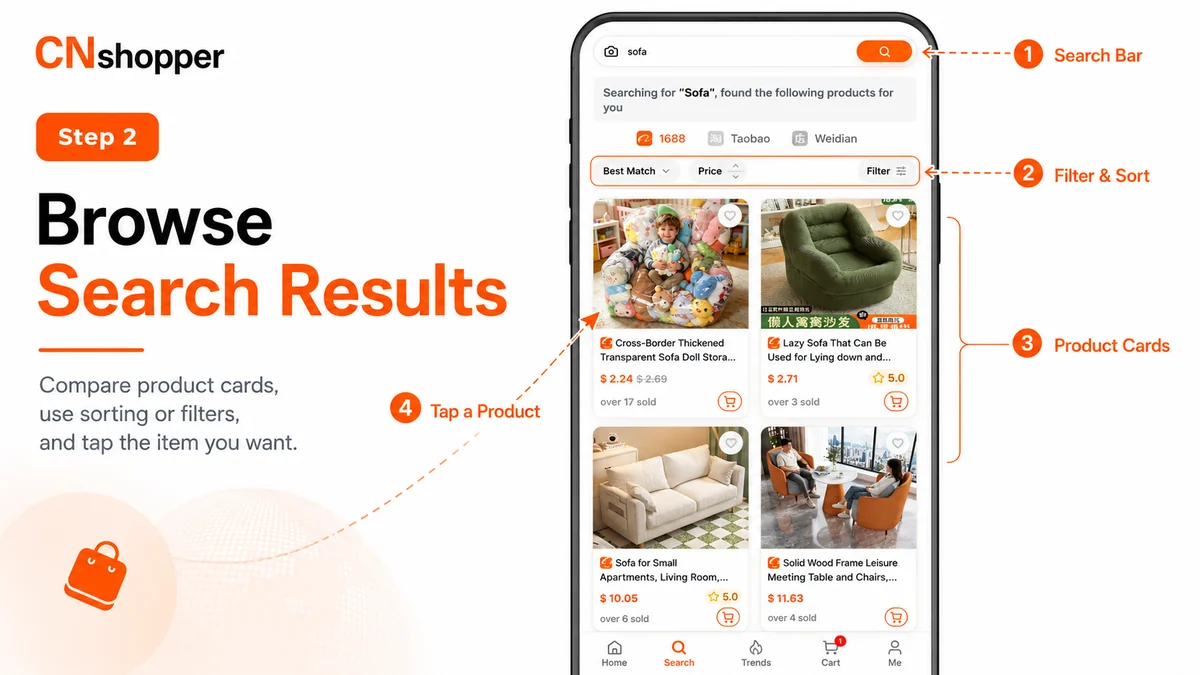
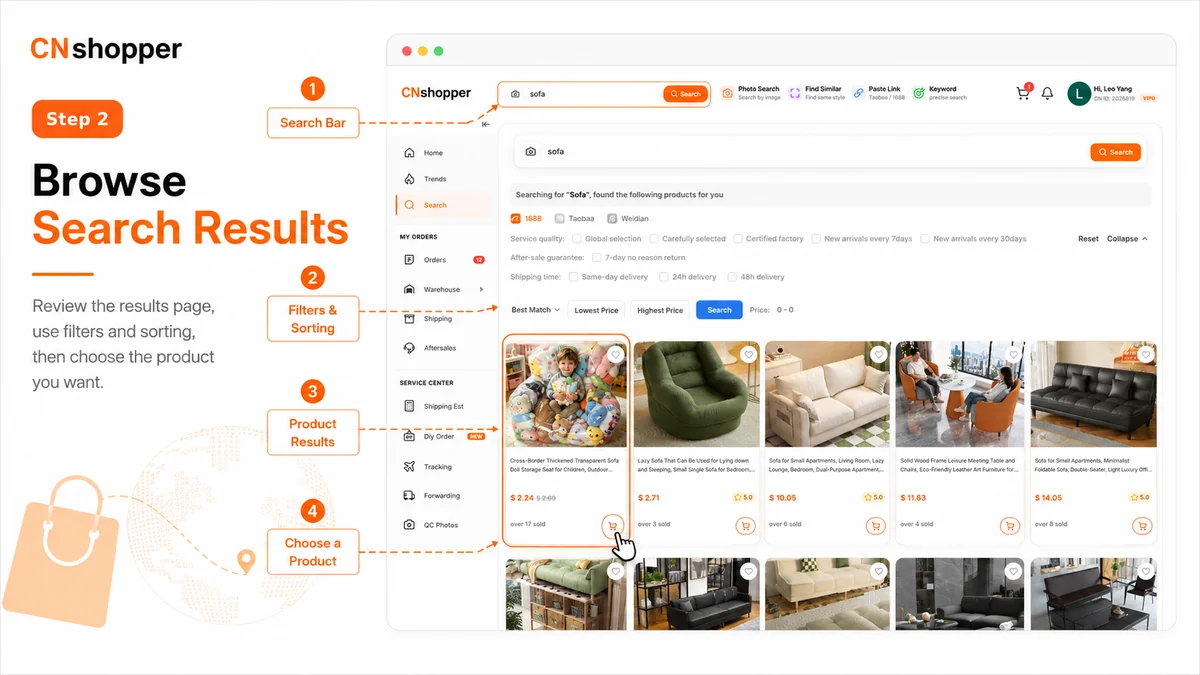
Choose the product
Open the item details and check what the pictured price actually buys. A low displayed amount may belong to one variant, an accessory or a quantity tier. Compare the selected item’s material, colour and seller information. For delivery planning, also identify batteries, liquids, fragile parts or unusually bulky packaging: an attractive listing does not mean an international line can carry it.
Step 3 / 12
Choose size, colour and quantity
Choose each option deliberately, including size and quantity. Compare the seller’s size chart with a garment you can measure; a familiar letter size is insufficient. Save a screenshot of the selected variant and any promised accessories. That record gives you something concrete to compare with warehouse photos later. Resolve missing measurements or conflicting options while the money is still uncommitted.
Step 4 / 12
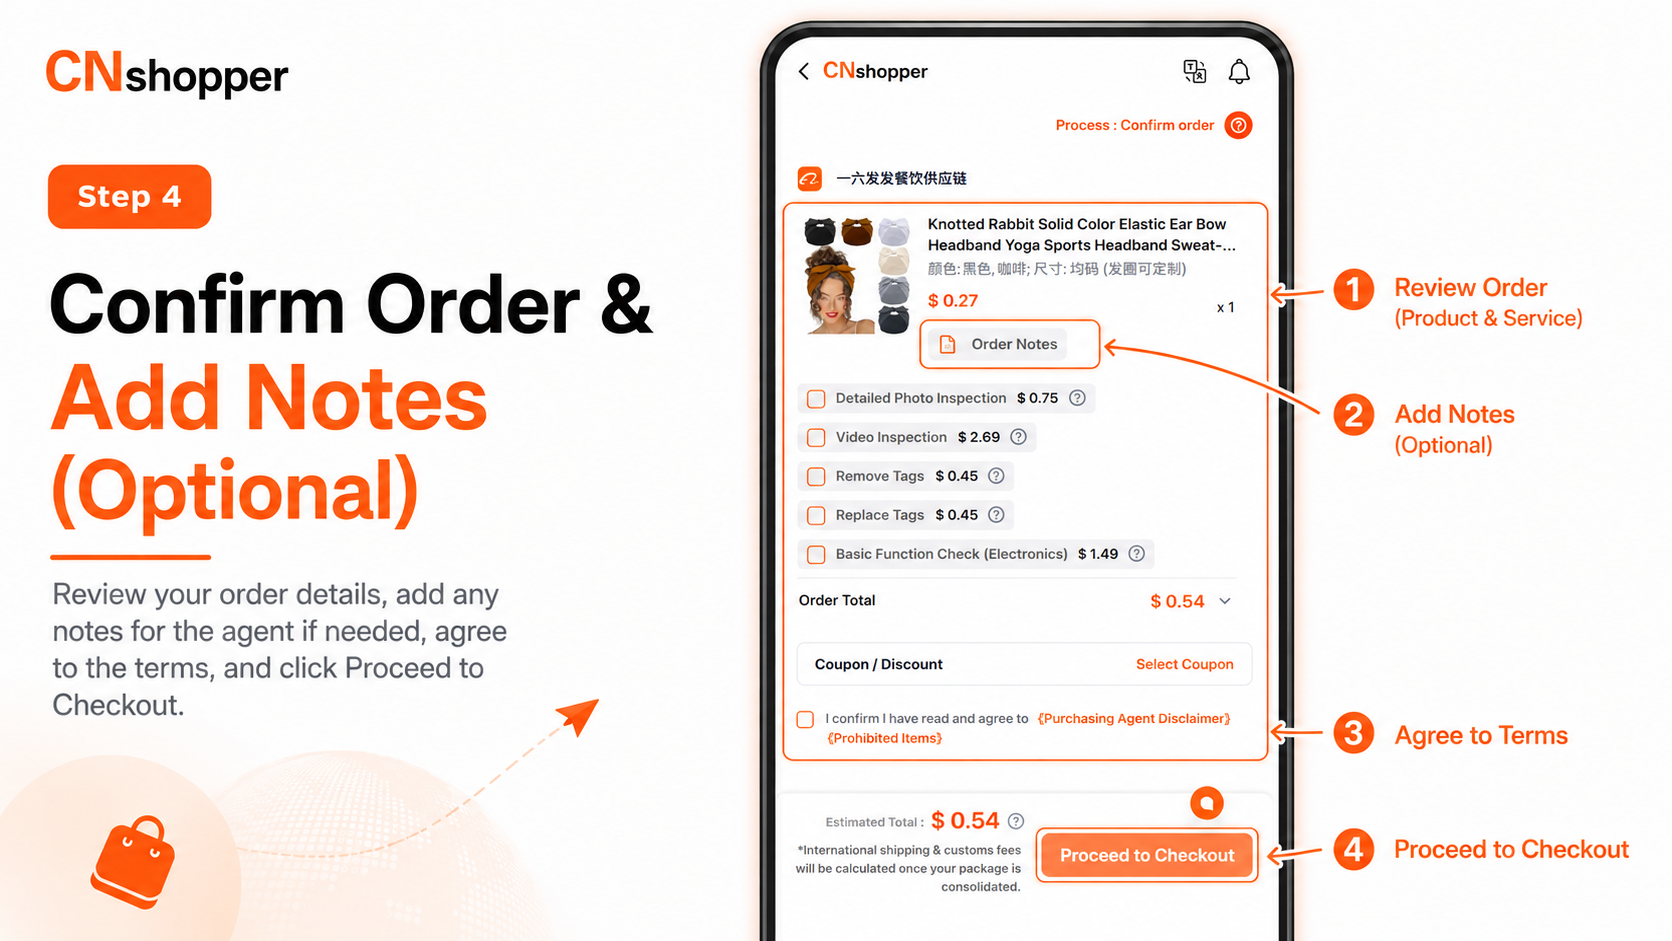
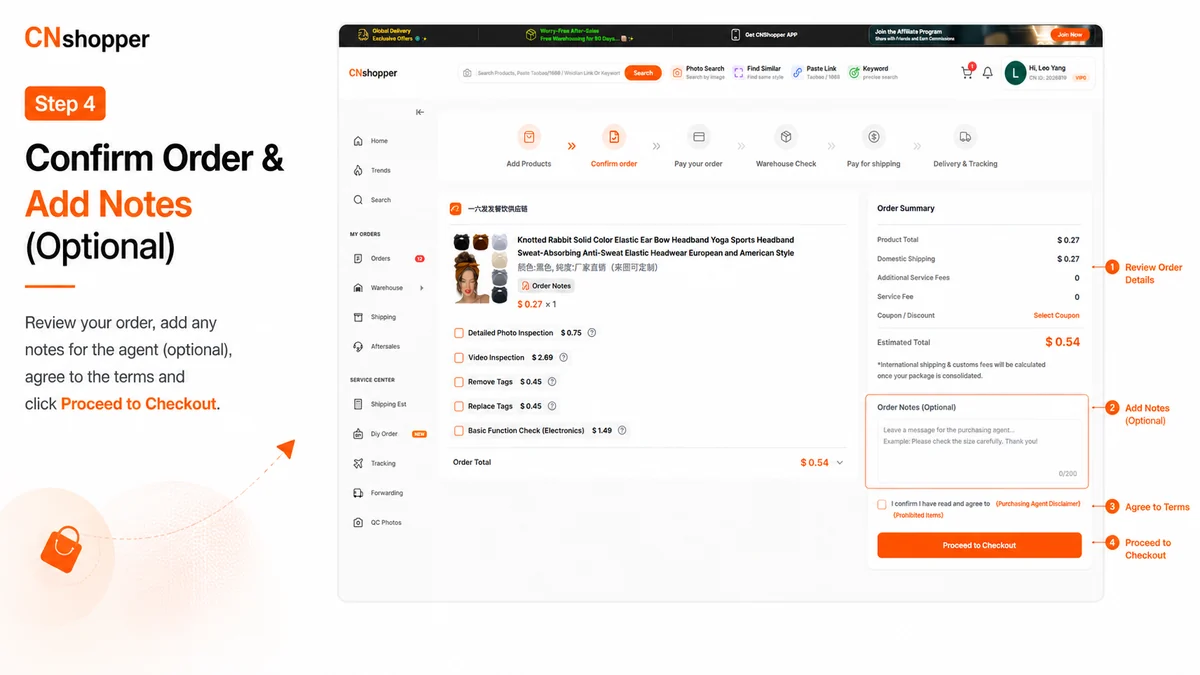
Add order notes
Write a short request the buyer can act on, such as confirming the pictured colour or retaining an accessory box. Separate a seller question from a warehouse packing request: they happen at different stages. A note does not reserve stock or guarantee a service. If a measurement or photo has an extra fee, confirm it before authorising the work and retain the answer.
Step 5 / 12
Submit the order and confirm the product cost
Check the item, selected options, quantity and China delivery charge in the summary. This is the last point to catch an unintended variant before funding the purchase. The official guide repeats the preceding confirmation artwork here; it represents the same decision panel. If a price is provisional, ask what will happen when the buyer confirms it rather than treating that amount as your delivered total.
Step 6 / 12
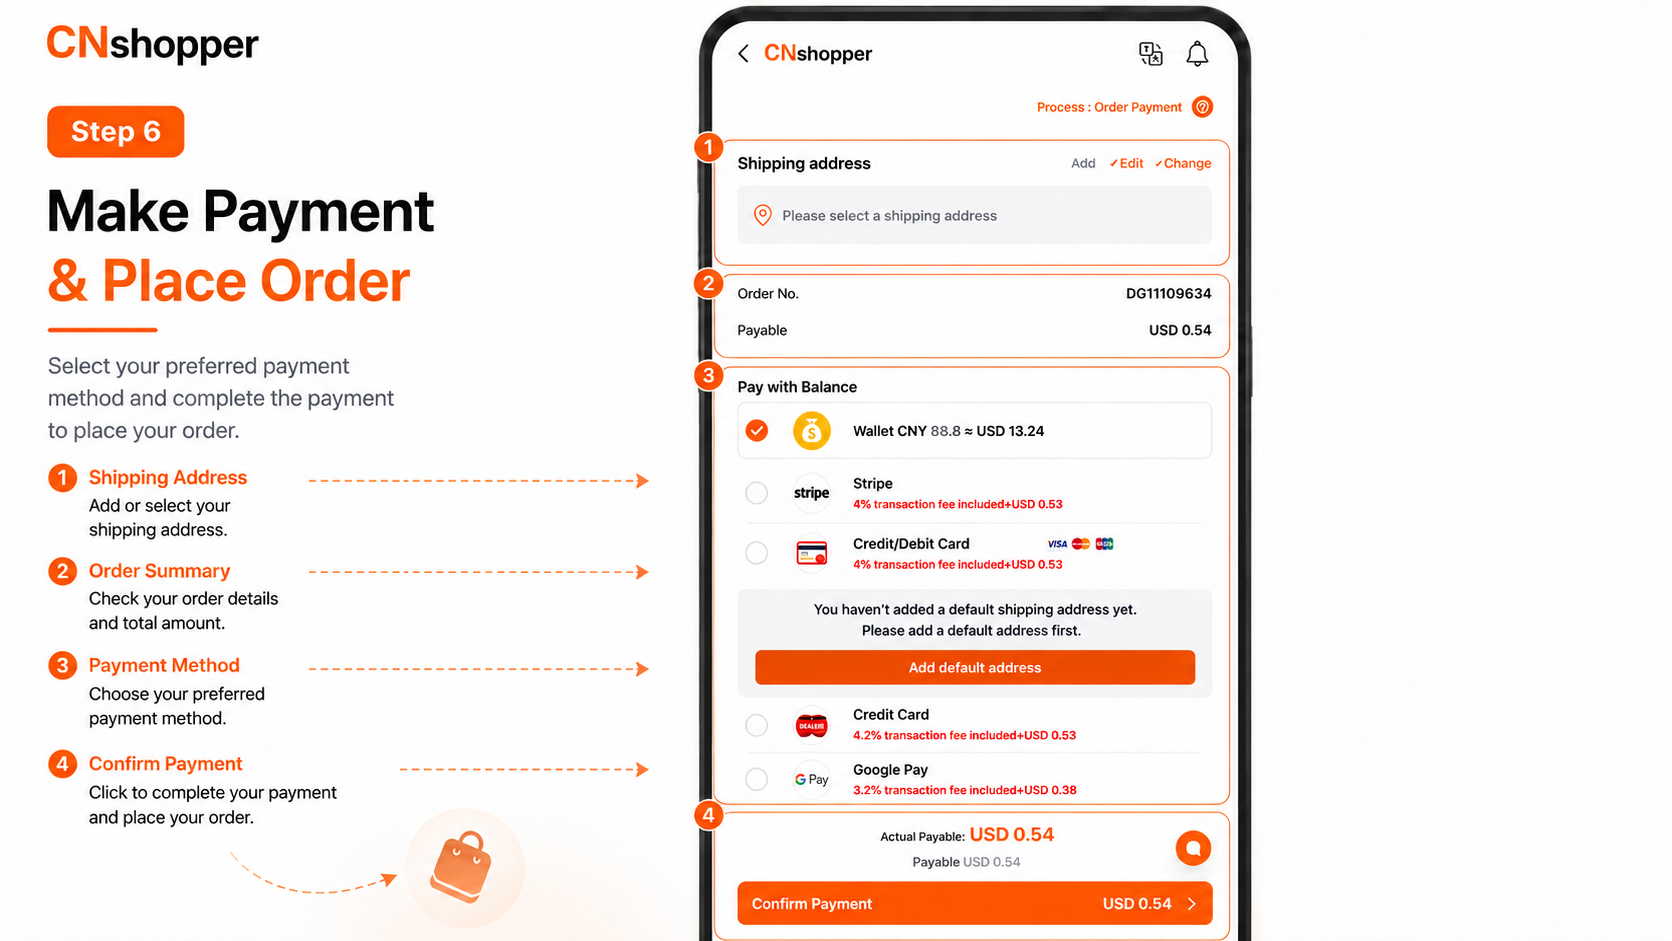
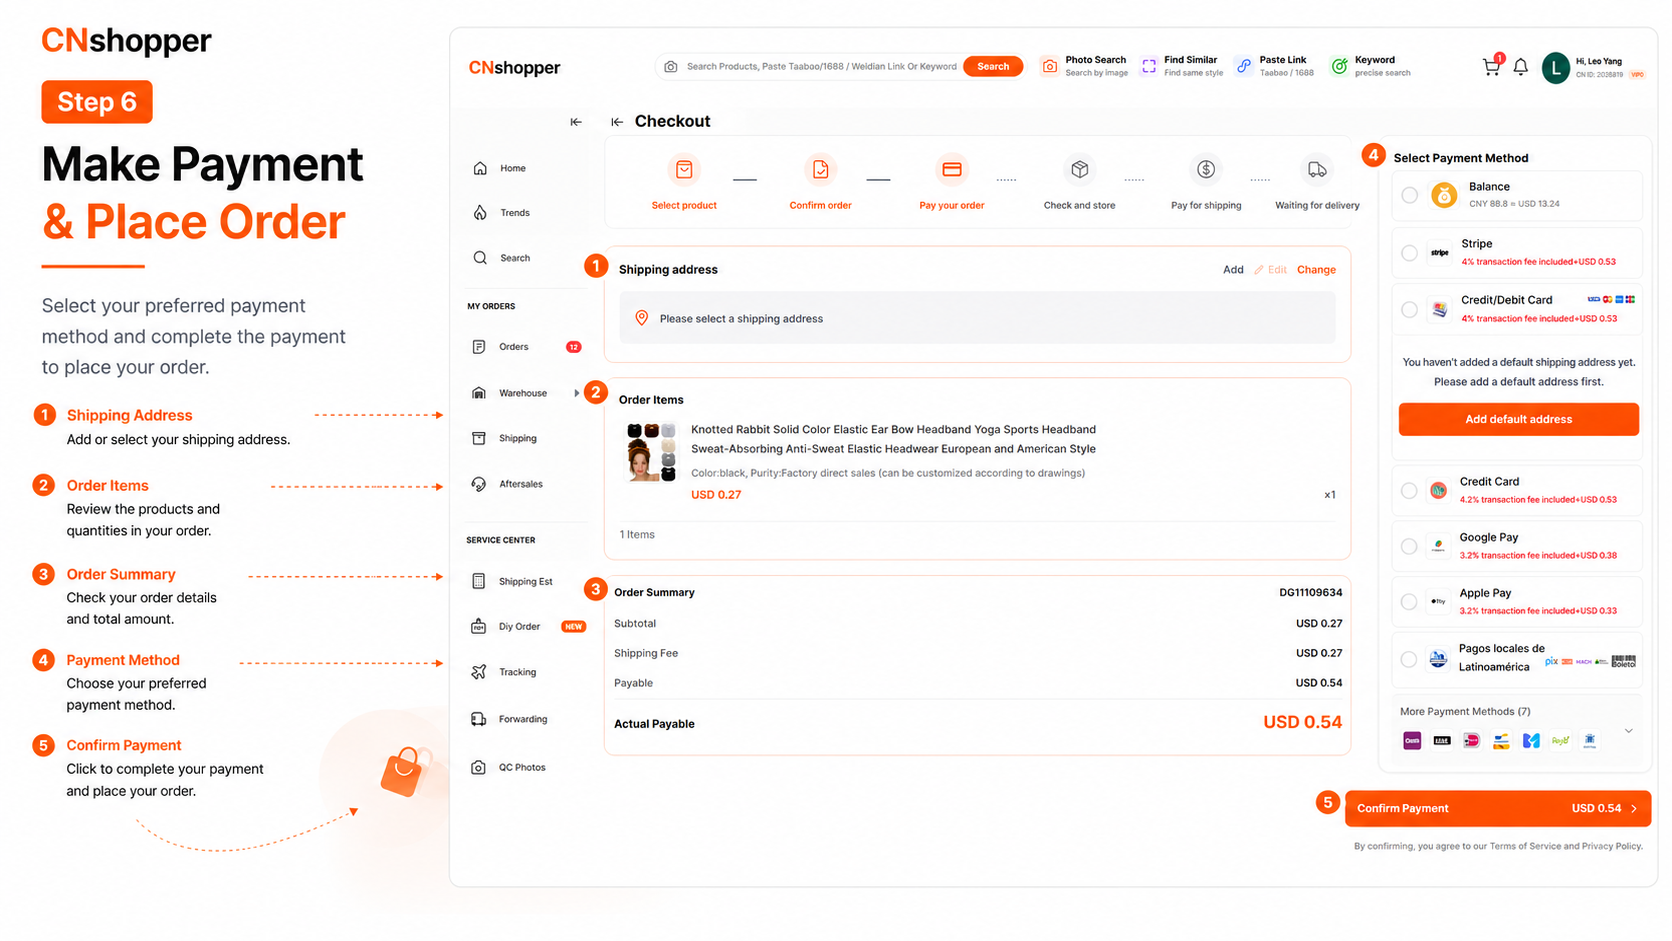
Pay for the product first
Pay only after checking the purchase amount, currency conversion and any method or service charge shown. This payment covers the product stage; the overseas parcel has not yet been priced. Keep the transaction reference alongside the order number. Money added to a wallet is not automatically a completed purchase, so return to the order status and confirm what action is still required.
Step 7 / 12
Wait for warehouse arrival
Watch the item’s path to the warehouse separately from the later overseas parcel. Seller dispatch, carrier delivery and warehouse registration can show different times. If one stage stalls, send the item order number and last update to support. Once it is registered, check the applicable storage deadline and any seller return window; neither is the same as an international claim deadline.
Step 8 / 12
Review QC photos before international shipping
Use the QC screen to compare the received item with the saved variant record. Look at the label, colour, number of pieces, accessories and visible damage. When a detail is too small, request a closer image or measurement and check its cost. Raise a mismatch before overseas dispatch and ask what return options remain. Photos document appearance; they do not certify authenticity, electrical safety or long-term durability.
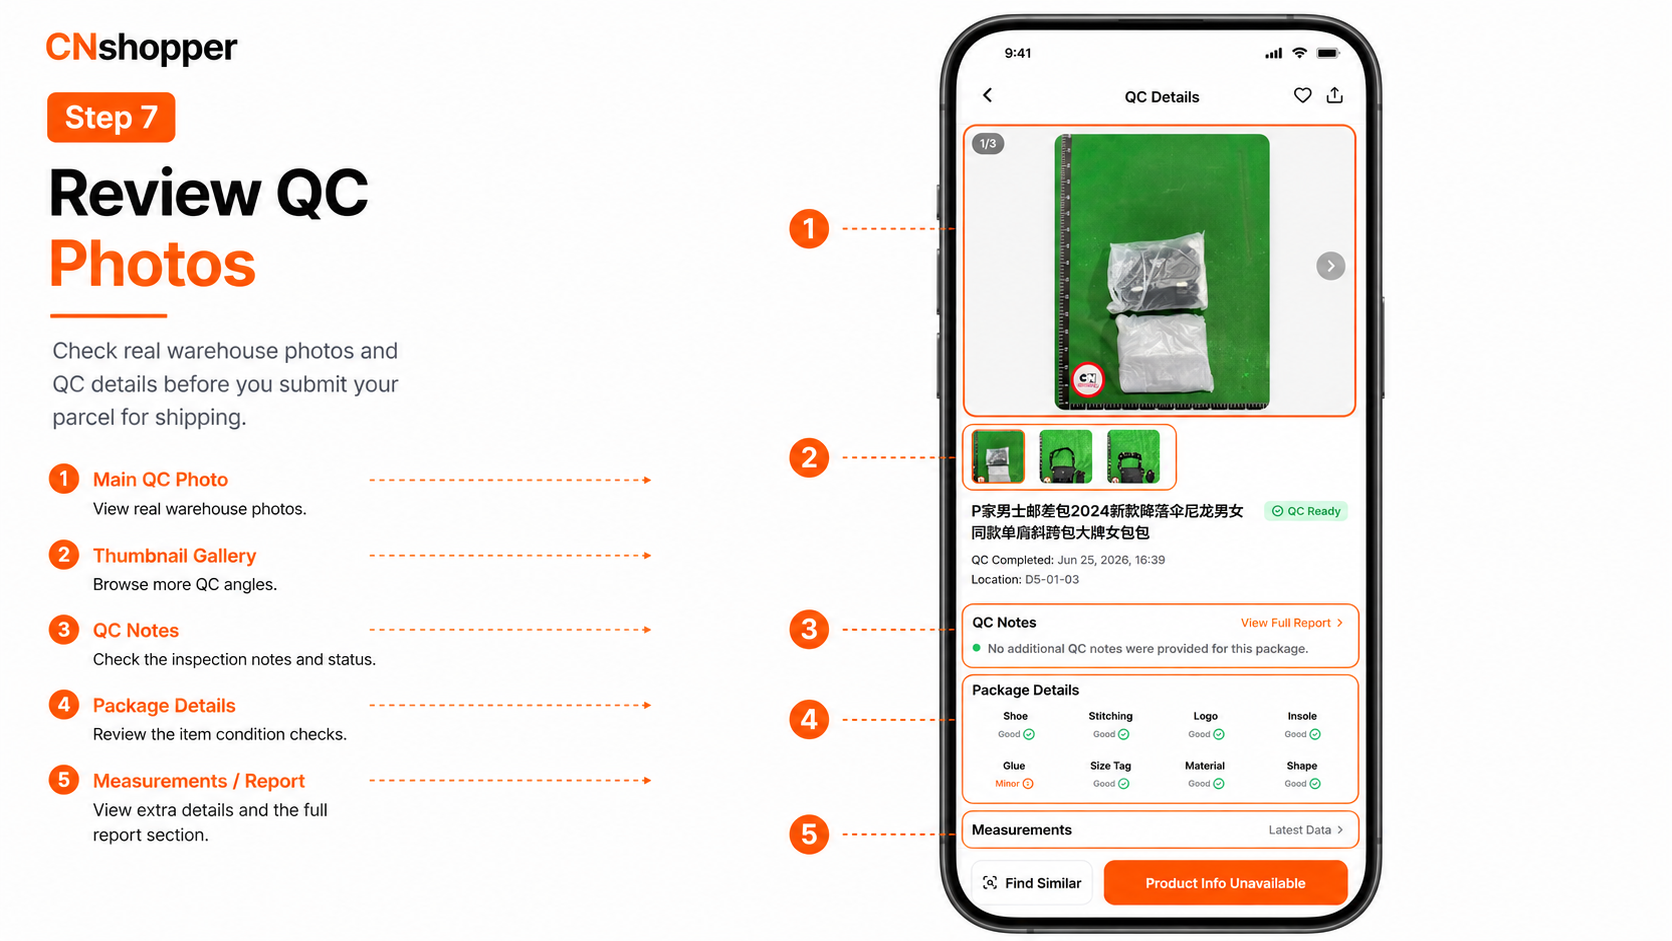
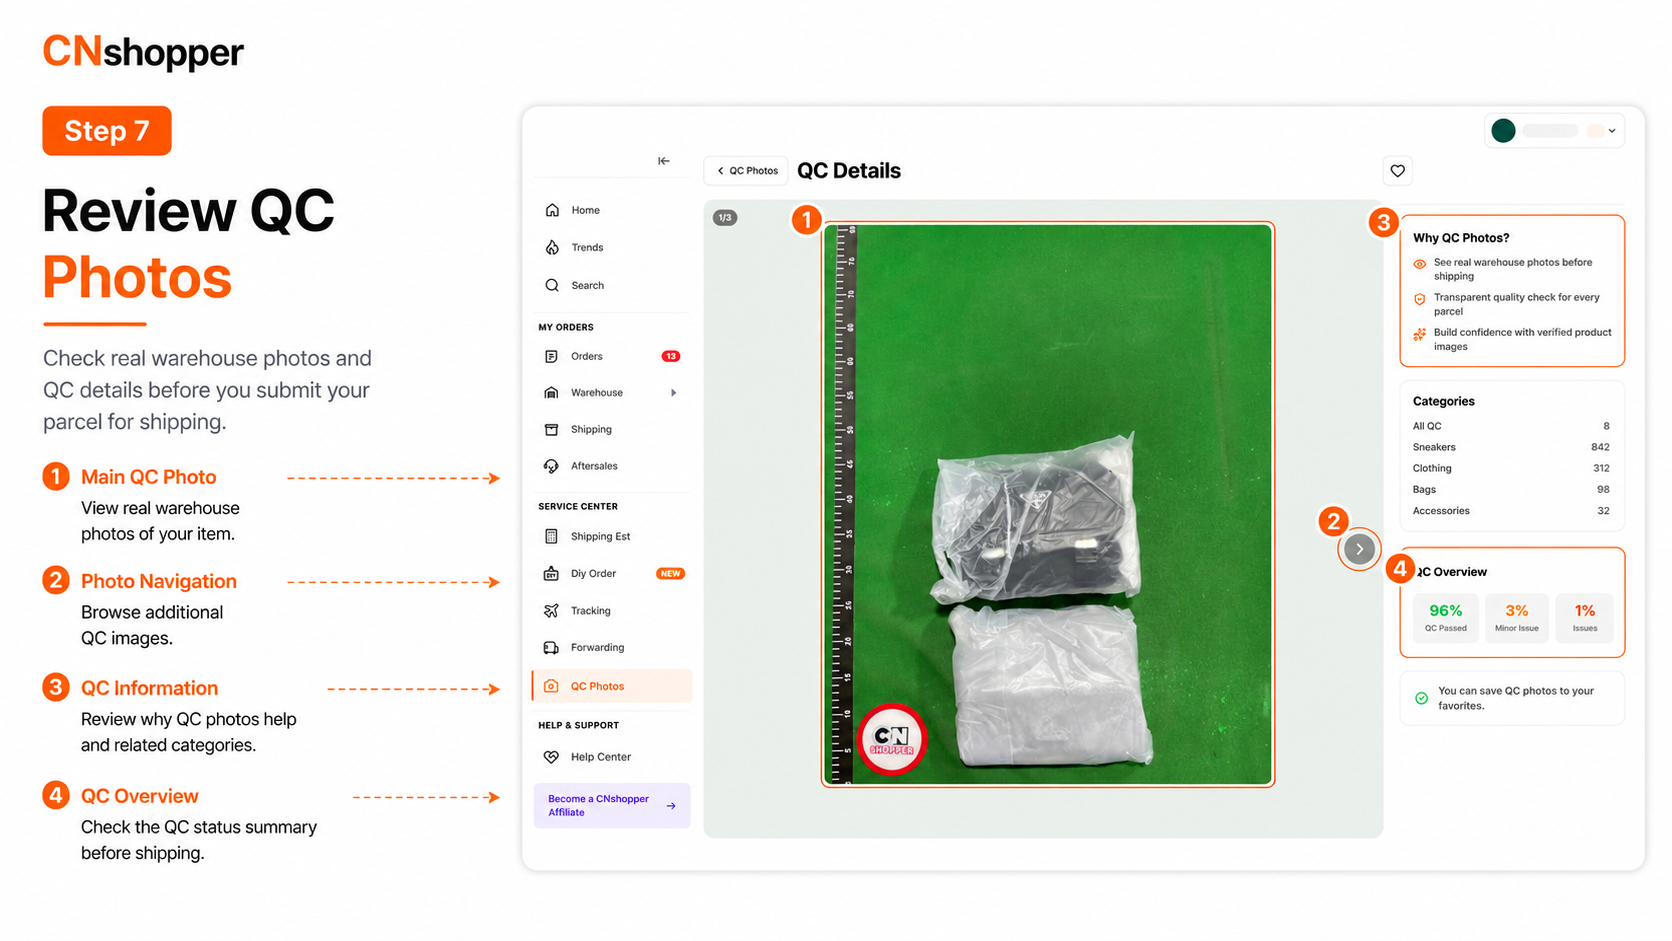
Check the goods before planning their arrival at your door
For each stored item, compare the label, count, colour and visible condition with your saved selection. Request a readable close-up or a particular measurement if needed. A full-size photo can answer more than a thumbnail, but neither certifies authenticity or tests every function. Identify the actual uncertainty before ordering an additional service.
Raise a mismatch through the item order before parcel submission and within the applicable return conditions. Storage time, seller return time and future parcel-protection deadlines are different clocks. Waiting to combine purchases does not automatically pause them. After the item is accepted, keep the QC evidence and the selected packing record; they provide a before-dispatch reference if something is missing or damaged at receipt.
Step 9 / 12
Consolidate your items
Build the parcel from the items you have accepted. Decide which retail boxes, protective inserts or accessories must stay before requesting repacking. Removing packaging can save space but may remove protection or useful evidence. Combining everything is not automatically cheaper: one restricted item or a larger box can remove shipping choices. Compare the packed parcel options and keep a record of the packing instructions.
Step 10 / 12
Choose an international shipping method
Compare available lines using the real destination, contents, packed weight and dimensions. Read item restrictions, tracking, tax treatment and the estimated transit range. Check how the delivery address and postcode must be written and whether the offered service supports your intended delivery point. If protection is offered, inspect its exclusions and evidence requirements. A line name or estimate alone does not promise acceptance or delivery on a particular day.
Step 11 / 12
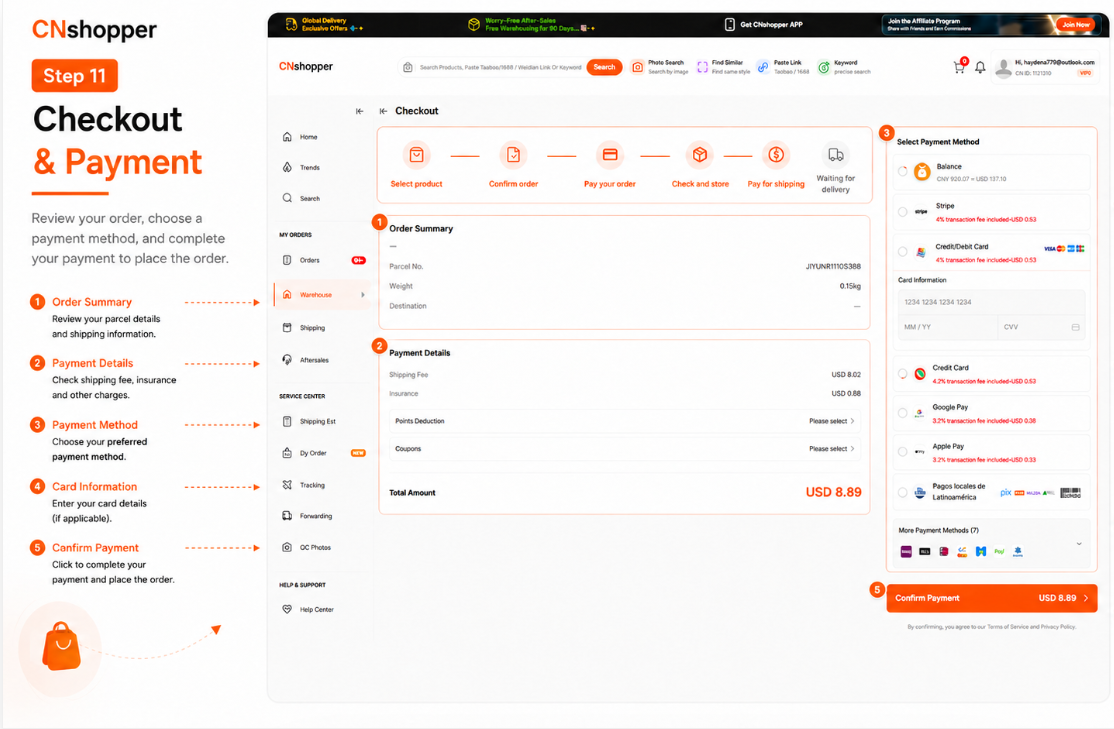
Pay international shipping
Before the second payment, review the final address, shipping line, packing services and any protection actually included. Save the parcel number and the terms offered with that purchase. An intention to buy protection is not proof that it was purchased: look for it on the receipt. Pay attention to any deadline in the account, and query an unexpected adjustment before confirming it.
Step 12 / 12
Track the parcel
Follow the parcel record and carrier scans, allowing for the first scan to appear after dispatch. At delivery, inspect the exterior, photograph any damage and keep the label, packaging and item records. A parcel never marked delivered needs different investigation from one marked delivered but missing. Use the appropriate help page, contact support promptly and provide the tracking number, dates and specific evidence; this guide cannot decide a claim.
Before your next order
Keep what worked: the useful size measurement, seller response, packed weight and actual delivery experience. A previous successful purchase does not guarantee future stock or the same freight price. Recheck the live listing and order summary each time.